Create Website with FlexPTO Template
Overview
The RunPTO Website Builder is an intuitive, user-friendly tool designed to empower Parent Teacher Organizations (PTOs) to create and manage their own websites with ease.
The Website Builder is accessible through the ‘Website Builder’ option.
A clean, organized layout ensures that even users with no technical background can navigate and use the builder effectively.
Website Setup and Management
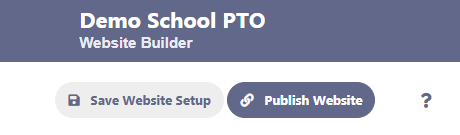
- Save Website Setup: Allows you to save the progress of your website configuration at any stage.
- Publish Website: With a single click, you can make your website live for your community to access.
Location
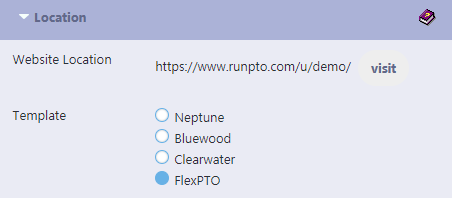
- Website Location: This is the URL where your PTO website will be accessible. For example, “https://www.runpto.com/u/demo” is a ready-to-use link provided by RunPTO where your website will be hosted.
- Visit: By clicking ‘visit’, you can preview your website in its current state.
- FlexPTO: This is the latest design template currently available for your website. It’s a flexible and user-friendly design, making it simple to navigate and pleasant to view.
Header Section
The Header Section is the first thing visitors will see upon arriving at the website, making it crucial for establishing the PTO’s identity and welcoming residents and visitors. It is customizable to fit the PTO’s branding and messaging needs.
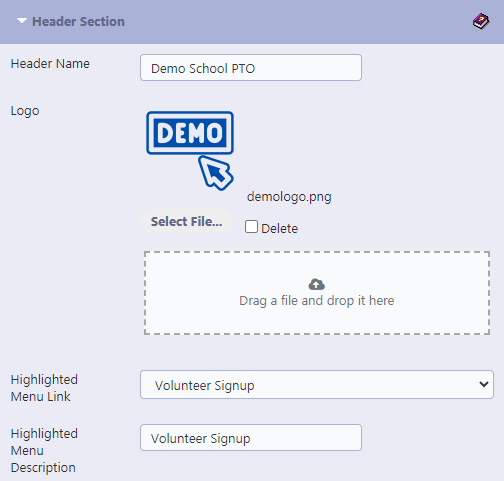
- Header Name: This is where you enter the name of your Homeowners Association, such as “Demo School PTO.” This name will be displayed prominently at the top of your website.
- Logo: You can upload your PTO’s logo here by clicking ‘Select File.’ The logo helps to establish your brand and gives your website a professional appearance. If you need to remove an already uploaded logo, you can click the ‘Delete’ checkbox. The image area displays the currently uploaded logo, “top.png” in this case, which can be a JPEG, PNG, or GIF file format. Ensure your logo is clear and of high resolution to maintain a professional image. (Note: Image Size should be less than 2MB , Anything above will not load)
- Highlighted Menu Link: This dropdown menu allows you to select which page or section of your website you want to emphasize or direct your visitors to, such as the ‘Member Portal’.
- Highlighted Menu Description: This is where you provide a brief description or the name of the highlighted menu link. The text entered here, “Volunteer Signup” for instance, will be what is displayed on your website to describe the highlighted link, guiding your visitors to a specific area of the site such as volunteer signup or important updates.
Be sure to save your setup regularly to avoid losing changes

Top Section
The Top Section of the RunPTO Website Builder is where you can set the introductory elements that visitors first encounter.
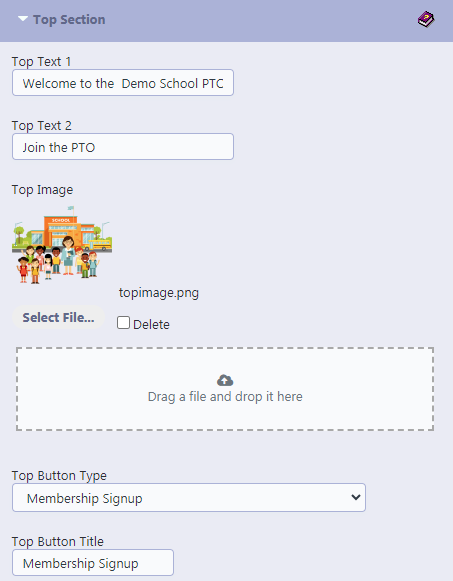
- Top Text 1: Enter a welcoming phrase or the name of your PTO here. For instance, “Welcome to Demo School PTO” sets a friendly tone right away.
- Top Text 2: Use this space for a slogan or a brief descriptor that encapsulates the spirit of your community.
- Top Image: Upload a image or a representative picture of your PTO by clicking ‘Select File.’ A good image could be of the community landscape, a common area, or the PTO building. If you’ve previously uploaded an image and wish to remove it, you can use the ‘Delete’ checkbox. The displayed image, “top.png”, will be what visitors see first, so make sure it’s high-quality and sets the right impression. (Note: Image Size should be less than 2MB , Anything above will not load)
- Top Button Type: This dropdown menu allows you to select a specific action or destination for a button on your website. In this case, “Membership Signup” is selected, which will lead users to a Membership Signup Form.
- Top Button Title: Here, you provide the text that will appear on the button itself. The title “Membership Signup” informs users of where the button will take them, promoting easy navigation.

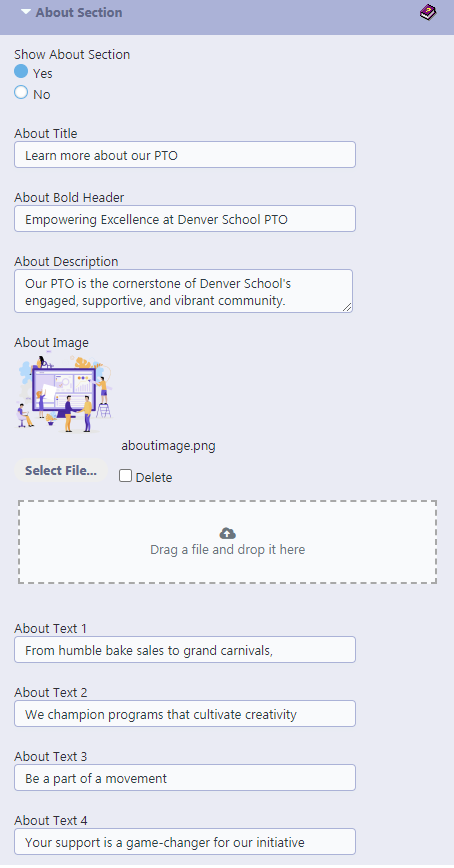
About Section
This section is designed to introduce the Parent Teacher Organization to visitors, offering a space to share the community’s values, history, or any important narratives that define the PTO.
- Show About Section: This switch allows the website administrator to either display (Yes) or hide (No) the About Section on the website. It provides flexibility in the presentation of the website’s content.
- About Title: Input a welcoming title, for instance, “Learn more about our PTO”, to draw visitors into learning more about the community.
- About Bold Header: Provide a description which will be displayed in bold.
- About Description: Provide a detailed description that captures the essence of your PTO, such as “Our PTO is the cornerstone of Demo School’s engaged, supportive, and vibrant community.”
- About Image: The section allows for the inclusion of an image to visually represent the community or the topic of the section. The file “aboutimage.png” is currently selected, with options to change (Select File) or remove it (Delete). (Note: Image Size should be less than 2MB , Anything above will not load)
- About Text Fields (1-4):
- These should be filled out with statements that are relevant to the user’s experiences and the HOA’s achievements. Examples could include:
- “From humble bake sales to grand carnivals, – Mention specific programs or events led by the community.
- “We champion programs that cultivate creativity” – Detail the qualifications and successes of the HOA’s board members.
- “Be a part of a movement” – List out the key amenities that make your HOA stand out.
- “Your support is a game-changer for our initiative” – Discuss the processes in place that ensure clear communication and decision-making.
Remember, each text field should contain information tailored to the user’s knowledge of the PTO and what they find most valuable about the community. After filling out these details, ensure that you save the changes to maintain an updated and engaging PTO website.

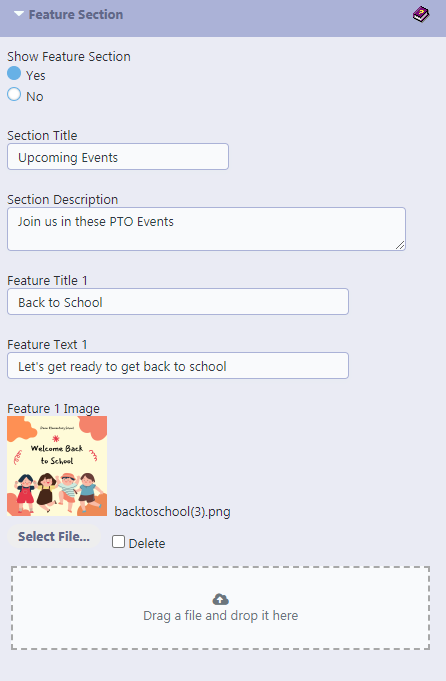
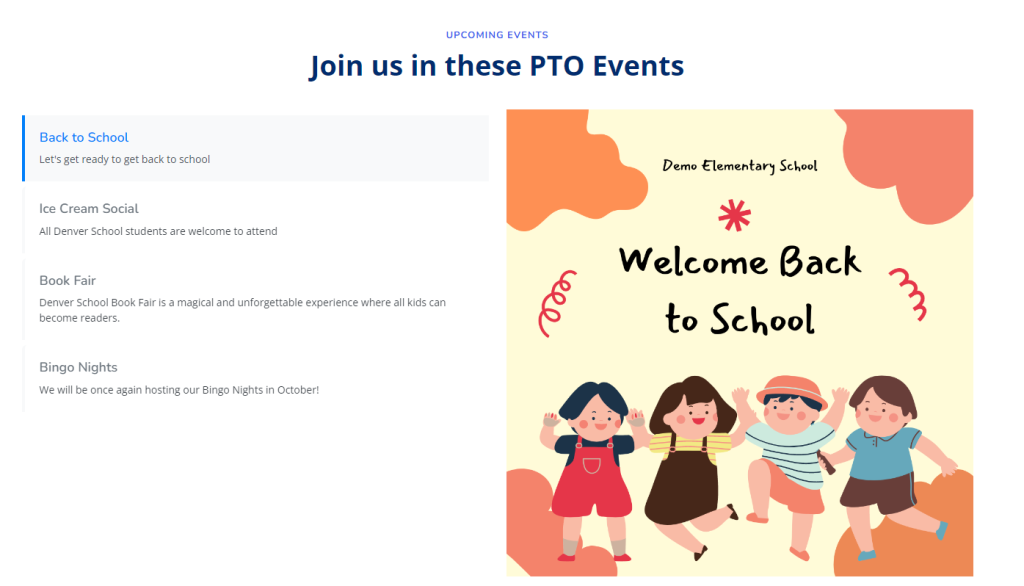
Feature Section
For the “Feature Section” of your PTO website , you can provide engaging content to highlight upcoming events, special announcements, or any key features of your community. Here’s a breakdown of the content fields for the help section:
- Show Feature Section: Toggle to decide if this section will be displayed on the website.
- Section Title: Enter a headline for the feature section, such as “Upcoming Events”.
- Section Description: Provide a brief description or introductory text that sets the context for the features you are about to list.
- Feature Title 1, 2, 3…: These are the headlines for each individual feature you want to showcase.
- Feature Text 1, 2, 3…: This field is for the description of each feature. It should be a concise text explaining the feature or detailing the event.
- Feature Image 1, 2, 3…: Upload an image that represents or relates to the feature. It could be a banner for an event, a photo of a community space, etc.
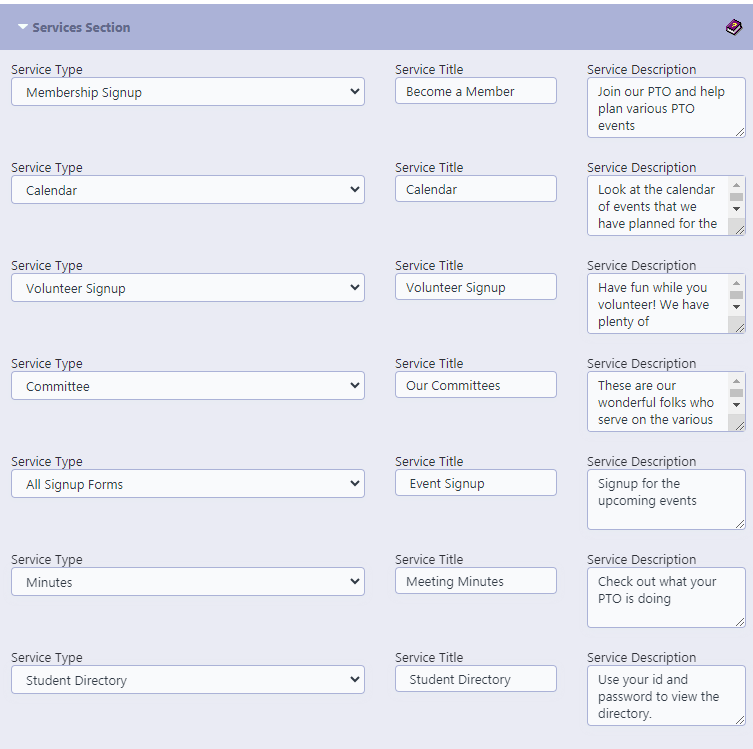
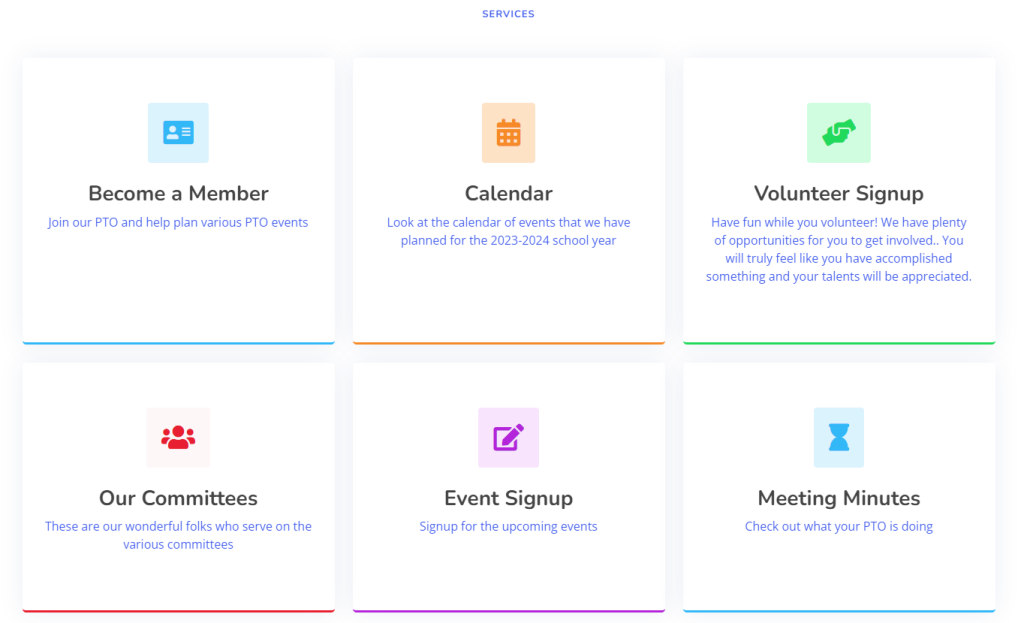
Services Section
For the “Services Section” in the RunPTO website builder, you have the flexibility to customize the content that appears on your PTO or Booster Club’s website. Depending on your selection from the dropdown list, you can display various services or choose not to display some sections at all. Here is a guide to help you set up each service type, including a generic description that you can modify as needed:
Do Not Show
Choose this option if you want to hide any service from the website temporarily or permanently.
Membership Signup
- Service Title: [Custom Title]
- Service Description: Encourage the community to get involved with the PTO by signing up for membership. Detail the benefits and the impact they can make.
Volunteer Signup
- Service Title: [Custom Title]
- Service Description: Invite members to volunteer for events and activities. Highlight the enjoyment and community connection from these experiences.
Calendar
- Service Title: [Custom Title]
- Service Description: Keep everyone informed with a calendar featuring all PTO events, meetings, and important school dates.
Calendar Events List
- Service Title: [Custom Title]
- Service Description: Provide a list view of upcoming events, allowing members to see what’s ahead at a glance.
Student Registration
- Service Title: [Custom Title]
- Service Description: Facilitate the process for parents to register their students for the school year.
Committee
- Service Title: [Custom Title]
- Service Description: Introduce the various committees within the PTO and explain their roles and how to join.
Chair
- Service Title: [Custom Title]
- Service Description: Detail the responsibilities and current projects of the chairpersons leading the PTO.
Teacher
- Service Title: [Custom Title]
- Service Description: Share information about teacher involvement in the PTO and how they contribute to the organization’s success.
Newsletter
- Service Title: [Custom Title]
- Service Description: Encourage visitors to subscribe to the PTO newsletter for updates, stories, and more.
Minutes
- Service Title: [Custom Title]
- Service Description: Offer access to recorded minutes from past PTO meetings, ensuring transparency and member engagement.
Form
- Service Title: [Custom Title]
- Service Description: Direct members to necessary forms for various purposes, such as event registration or volunteer applications.
Shopping Cart
- Service Title: [Custom Title]
- Service Description: Provide a smooth shopping experience for PTO fundraisers, merchandise, and event tickets.
Student Directory
- Service Title: [Custom Title]
- Service Description: Securely access the student directory. Useful for parents and teachers for community building.
By Laws
- Service Title: [Custom Title]
- Service Description: Familiarize members with the PTO bylaws, the foundational rules governing the organization.
Online Store
- Service Title: [Custom Title]
- Service Description: Browse and purchase PTO merchandise to show support and spirit.
Signup Form for Specific Events (e.g., May Fair, Talent Show – 2023)
- Service Title: [Custom Title for Event]
- Service Description: Invite members to participate in special events by signing up through the provided forms.
When setting up the “Services Section,” it’s important to consider what will be most useful for your members. Keep descriptions succinct but informative, and ensure that the titles are engaging and self-explanatory. Regularly review and update the content to keep it relevant and accurate.
Service Section (External Links)
The “Services Section – External Links” within the RunPTO website builder allows PTOs and Booster Clubs to add links to various services, both external and internal, that are pertinent to the organization. This feature can be used to direct members and visitors to specific web pages, documents, or external resources. Here’s a help section guide on how to use this feature effectively:
- Adding Services with Links: To add a service, click on the ‘Add New’ button. Each service will require the following information:
- Title: The name of the service.
- Description: A short description of the service. It could be a tagline or a brief statement about the service.
- Icon Image: Choose an icon that best represents the service. This will be displayed next to the service title on the website.
- URL: Provide the link to the service’s website or a relevant contact page. This will be the destination users are directed to when they click on the service.
- Editing and Deleting Services: To edit an existing service, change the fields as necessary and click ‘Save’. If you need to remove a service, click the ‘Delete’ button next to the corresponding service entry.
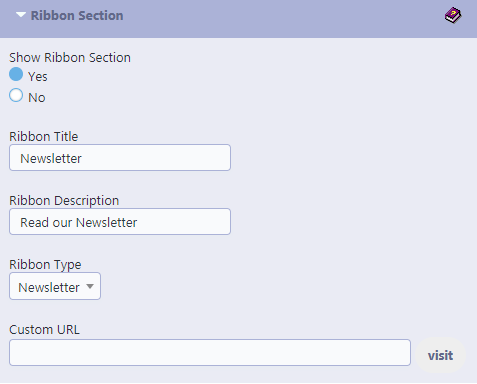
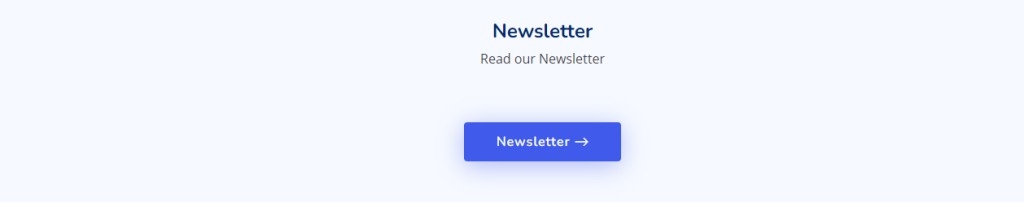
Ribbon Section
The “Ribbon Section” in the RunPTO website builder is a feature that allows you to highlight a specific area of your PTO or Booster Club’s website, such as a newsletter, an announcement, or a call to action. Here’s a guide to help you set up and customize the Ribbon Section:
- Show Ribbon Section:
Choose ‘Yes’ to display the Ribbon Section on your website.. Choose ‘No’ to hide the Ribbon Section. Use this option if the special highlight is not needed at the moment. - Ribbon Title:
Enter the name of the section or feature you want to highlight (e.g., “Newsletter”, “Sign-Up Today!”, “Event Reminder”). - Ribbon Description:
Provide a short but compelling description that encourages visitors to engage with the highlighted section (e.g., “Read our Newsletter”, “Join our Volunteer Team”). - Ribbon Type:
Select a type from the dropdown menu that best describes the purpose of the ribbon. This could be ‘Newsletter’, ‘Event’, ‘Alert’, etc. Each type may have predefined styles or behaviors. - Custom URL:
If the ribbon is meant to direct users to a different page or an external site, enter the complete URL here. Ensure that it is correct and functional. - Visit Button:
The button typically associated with the Ribbon Section, usually labeled as ‘visit’ or similar, will take users to the URL provided when clicked.
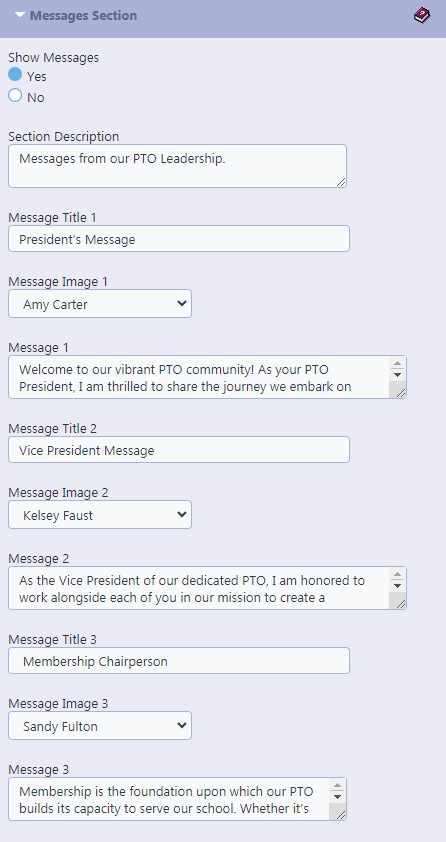
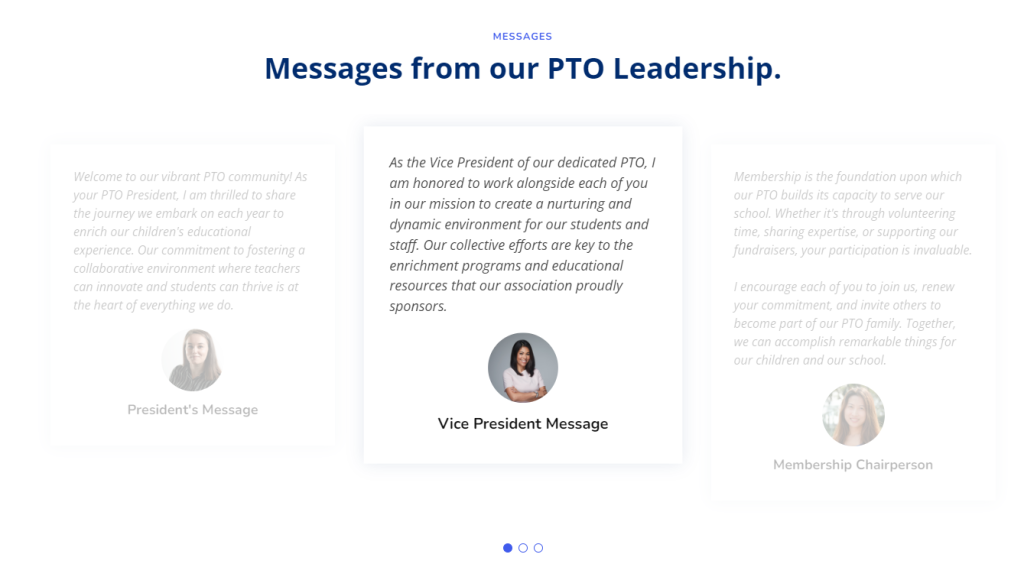
Message Section
The Messages section of your PTO website is a dedicated space for the leadership team to communicate important information, updates, and friendly reminders to the community members. Here, you can highlight key messages that embody the spirit and ongoing activities of your association.
- Show Messages: Choose “Yes” to display the messages section on your website. Select “No” to hide it.
- Section Description: Provide a brief introduction or headline for the message section, such as “From Our PTO Leadership.”
- Message Title 1, 2, 3, …: These are the headlines for each individual message. Use titles that grab attention and give a hint about the content of the message.
- Message Image 1, 2, 3, …: Upload a representative image that relates to each message. This could be a photo of the message’s author or an image that complements the message topic.
- Message 1, 2, 3, …: The main text area where you detail the message from the PTO leadership. This could be a welcoming note to new residents, safety guidelines, event announcements, or any other communication deemed significant by the PTO..
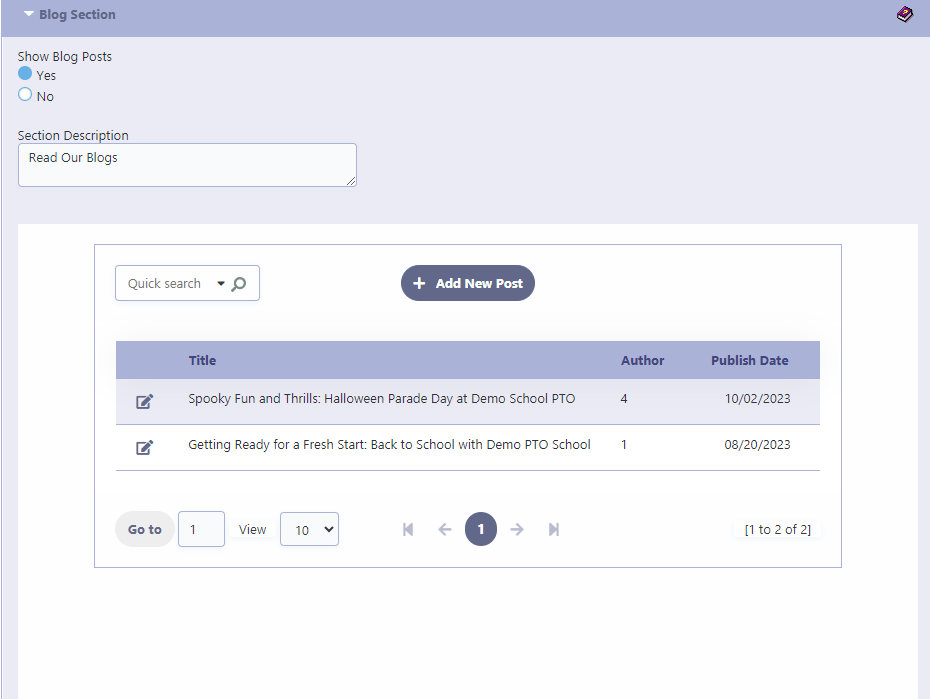
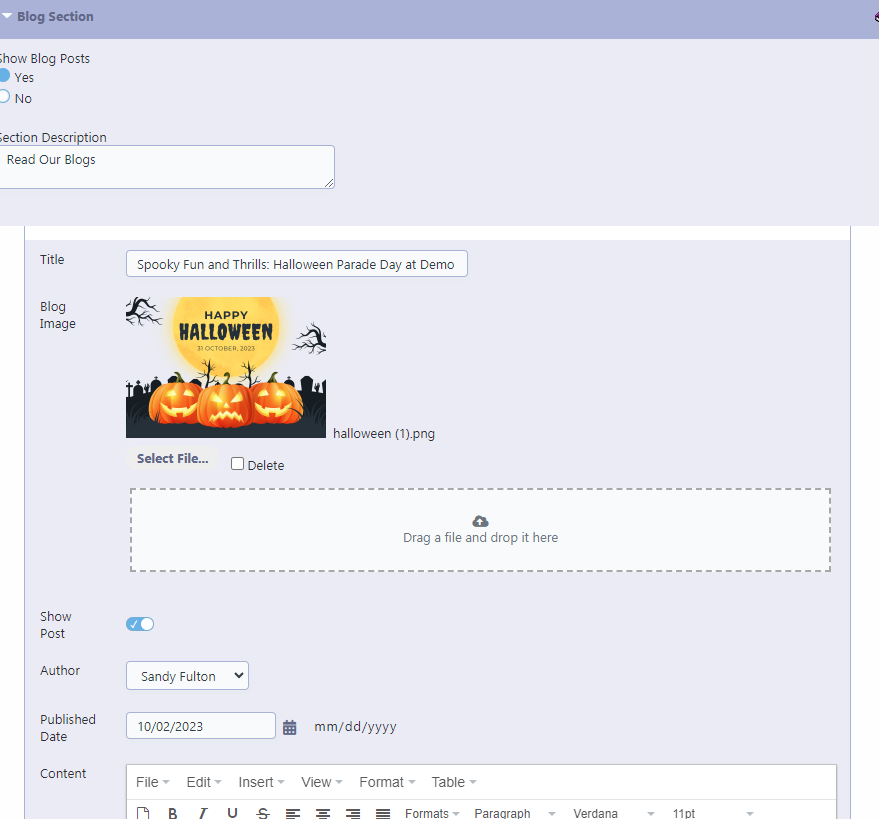
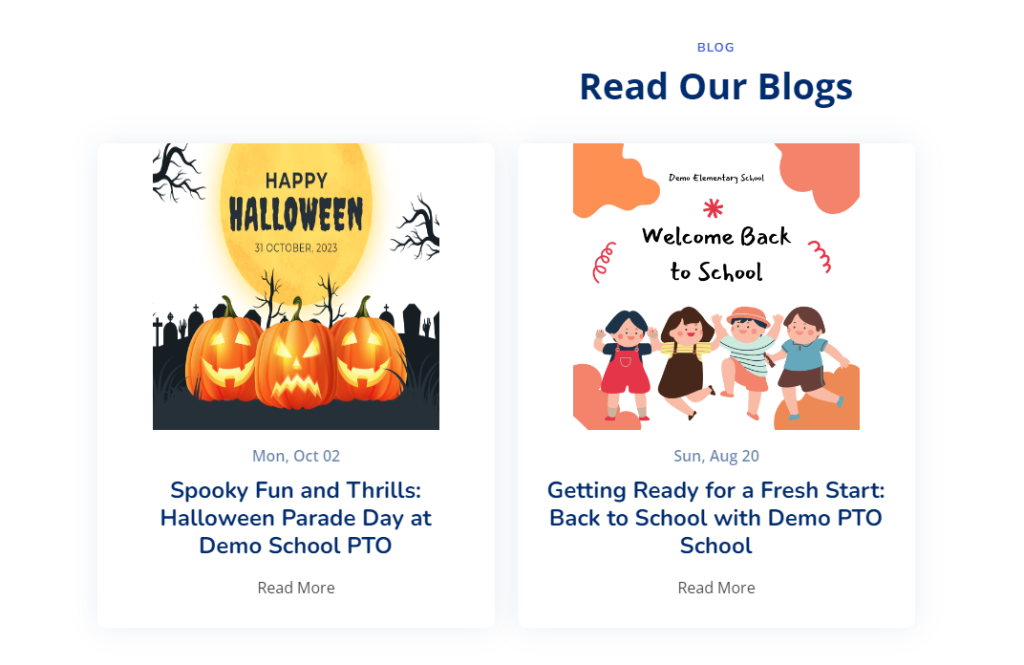
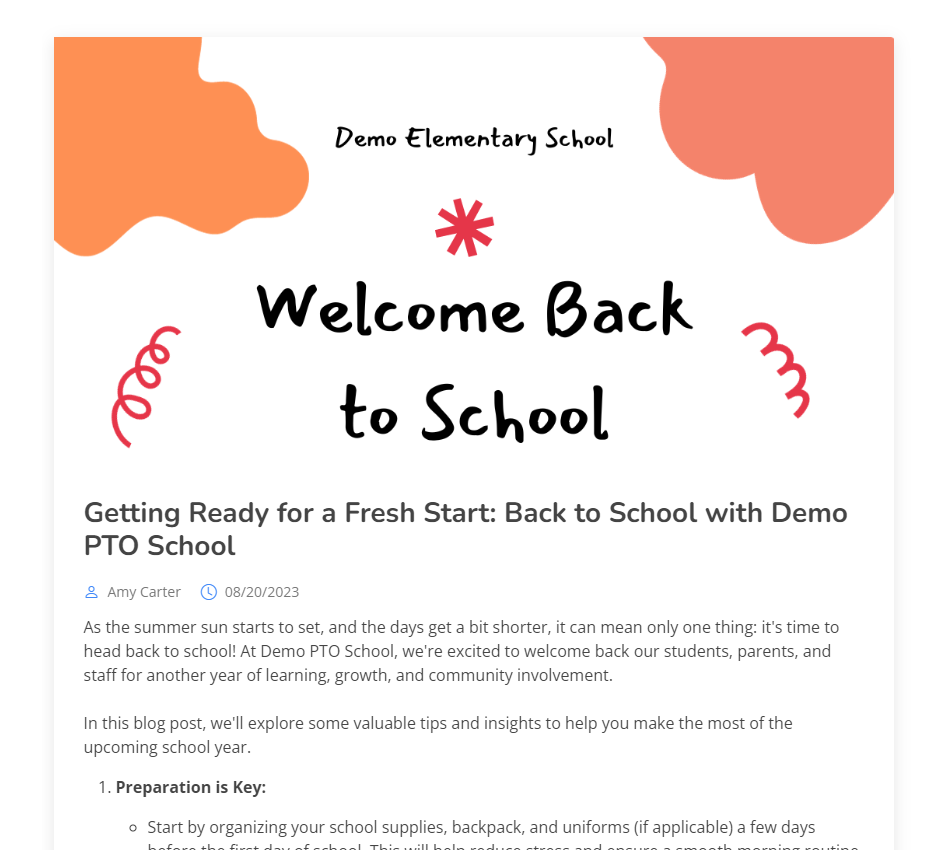
Blog Section
- Show Blog Posts: This toggle option allows users to decide if the blog section should be displayed on their PTO website. It’s useful for sharing updates, news, events, or informative articles with residents.
- Section Description: This is a brief text that describes what the blog section is about, such as “Community News” or “Updates from the PTO Board.” It provides context to the website visitors about what type of content they can expect to find in the blog posts.
Individual Blog Post Fields
- Title: The title of the blog post. It should be catchy and summarize the content of the post to entice readers to click and read more.
- Blog Image: A visual representation of the blog post’s content. It could be a relevant photograph or a graphic that supports the post. This field allows you to upload the image file from your computer. (Note: Image Size should be less than 2MB , Anything above will not load)
- Show Post: A switch to specify whether this particular blog post should be visible to website visitors.
- Author: A drop-down menu where you can select the name of the author to be displayed. You can also choose ‘Do Not Show’ if you prefer not to display authorship.
- Published Date: The date when the blog post was published. It can be entered manually or selected from a calendar interface.
- Content: The main text area for the blog post content. Here, users can write the article, format text, insert images, links, and other media to create engaging content.
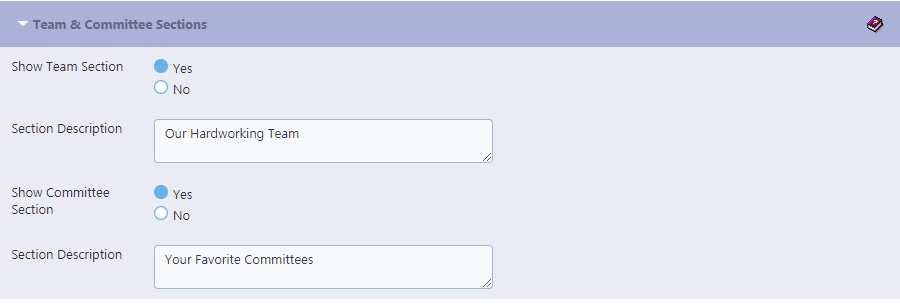
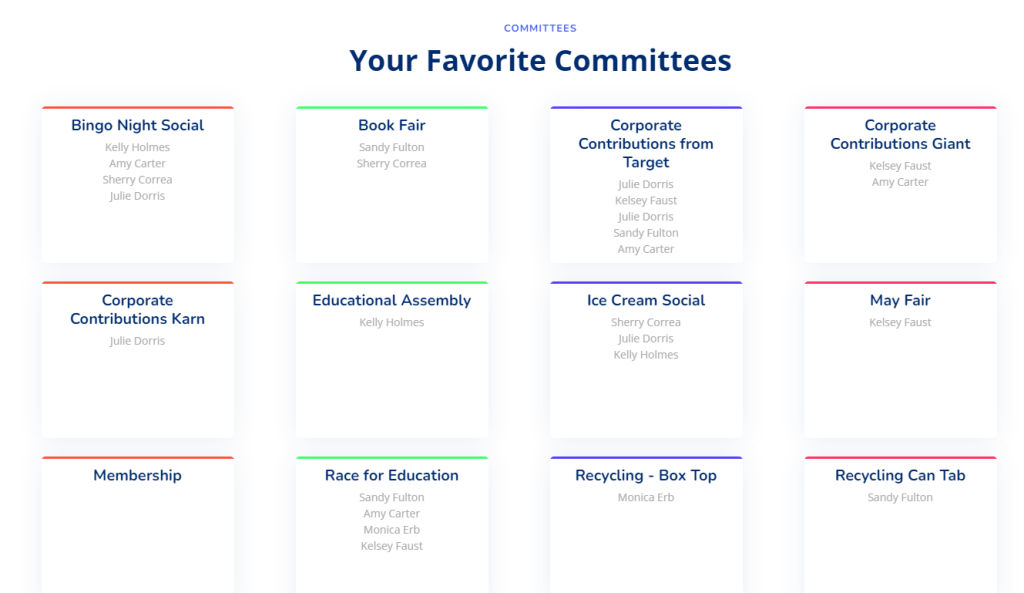
Team & Committee Section
The purpose of the Team Section is to introduce thePTO board members or chairpersons to the community. This section adds a personal touch to the PTO’s website, allowing residents to become familiar with the individuals overseeing the community’s affairs. The information displayed in this section is automatically retrieved from RunPTO’s Board/Chairperson module, ensuring that the team’s details are up-to-date and accurately represented. The same goes for the Committee section.
Team Section
- Show Team Section: This toggle option allows you to choose whether or not the team section is displayed on your website.
- Section Description: This field is where you input a brief introduction or description of your team. It sets the context for the website visitors about the team members they will see listed below.
Committee Section
- Show Committee Section: Similar to the team section, this toggle lets you decide if you want the committee section to be visible on your website.
- Section Description: Here, you describe the committees that operate within your PTO. This could include a general statement about the roles and contributions of these committees to the community.

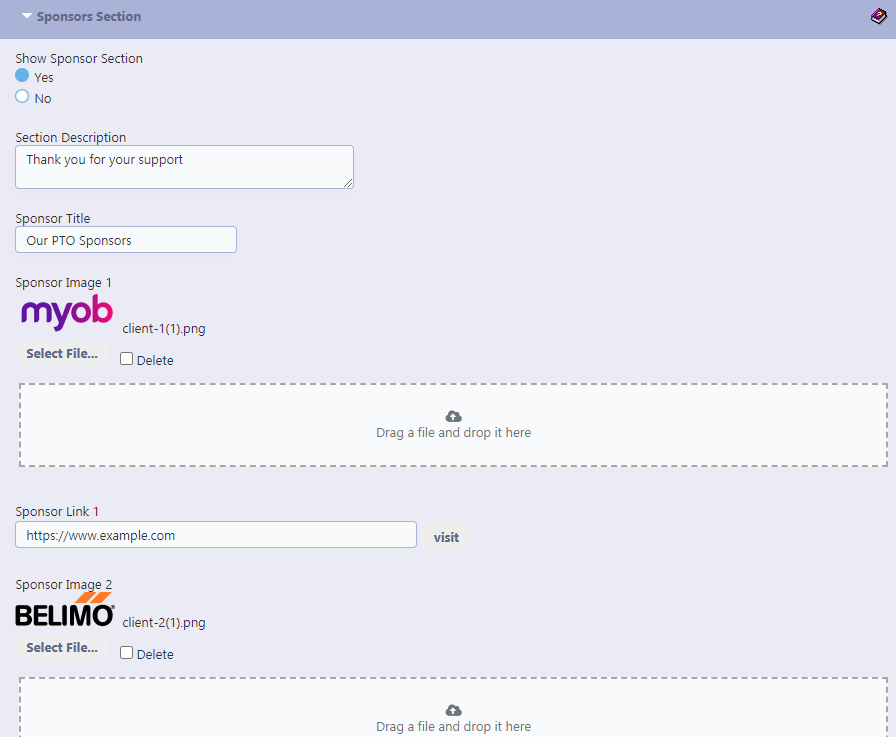
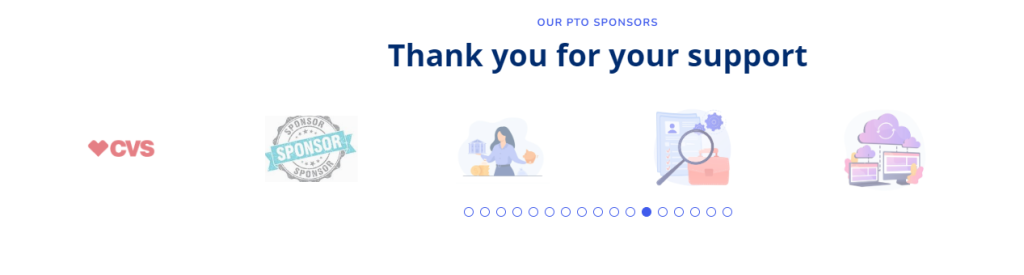
Sponsors Section
The “Sponsors Section” in the RunPTO website builder is designed to acknowledge and showcase the sponsors of your Parent Teacher Organization (PTO) or Booster Club. This feature can help you to display sponsor logos, link to their websites, and express gratitude for their support. Here’s how to configure this section:
- Show Sponsor Section:
Choose ‘Yes’ to display the section. Choose ‘No’ to hide the section. - Section Description:
Enter a message to thank sponsors or describe the section. - Sponsor Title:
Provide a title for the sponsor area, such as “Our PTO Sponsors”. - Sponsor Image Upload:
Use ‘Select File…’ to upload a sponsor logo. To remove a logo, tick the ‘Delete’ checkbox. - Sponsor Link:
Insert the URL to the sponsor’s website for visitors to follow. - Multiple Sponsors:
Repeat image and link upload steps for each sponsor.
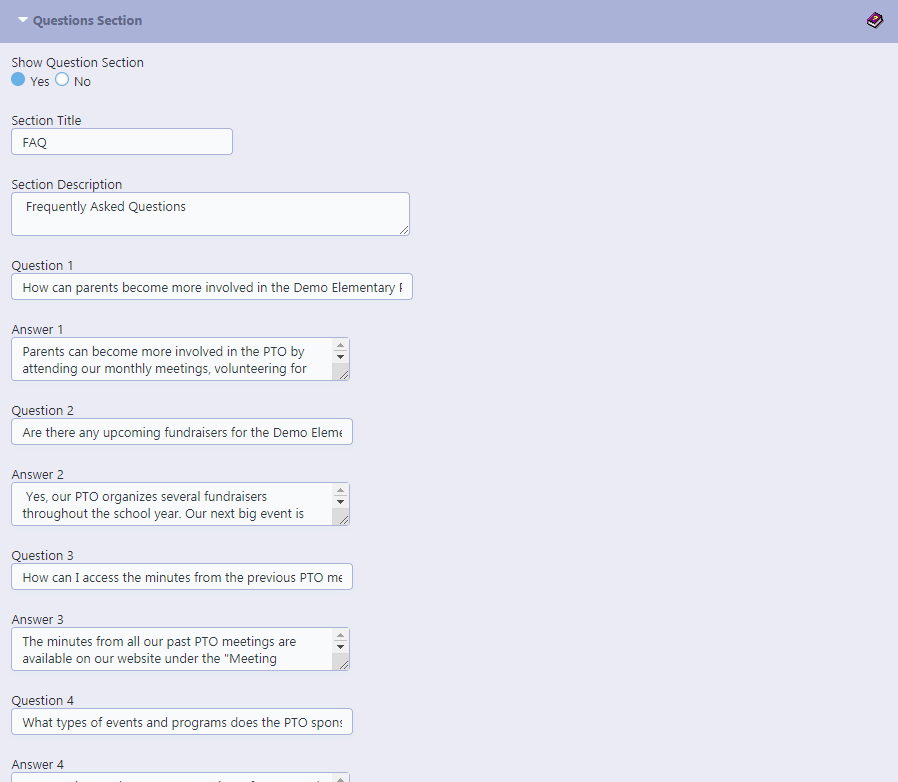
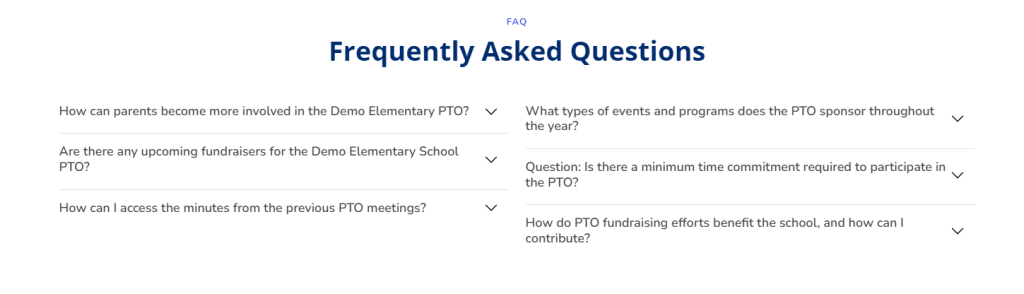
Questions Section
This section acts as a Frequently Asked Questions (FAQ) resource, providing quick and straightforward answers to the PTO members’ most frequent inquiries. It is an essential tool for reducing the volume of routine questions directed to the members by providing accessible information. The Questions Section is an invaluable part of the PTO’s digital presence, allowing for efficient communication and fostering a sense of support and accessibility within the community. It’s a self-service resource that empowers residents with instant information while streamlining the PTO’s operations.
- Show Question Section: This toggle allows the PTO to choose whether the Questions Section is visible (Yes) or hidden (No) on the website. This flexibility is useful for updating the FAQ or adding new questions without disrupting the user experience.
- Section Title: The heading of the FAQ section, which in this case is set to “Frequently asked questions.” This title can be customized to align with the PTO’s specific terminology or branding preferences.
- Section Description: This field is intended for a brief introduction or overview of the section. It can explain the purpose of the FAQ or how to use it.
- Question 1 to Question 6: These fields are for the actual questions that the PTO members frequently ask. They are designed to be concise and to the point, for example, “How do I pay my PTO Member Dues?” or “What are our PTO Dues?”
- Answer 1 to Answer 6: Corresponding to each question, these text boxes.
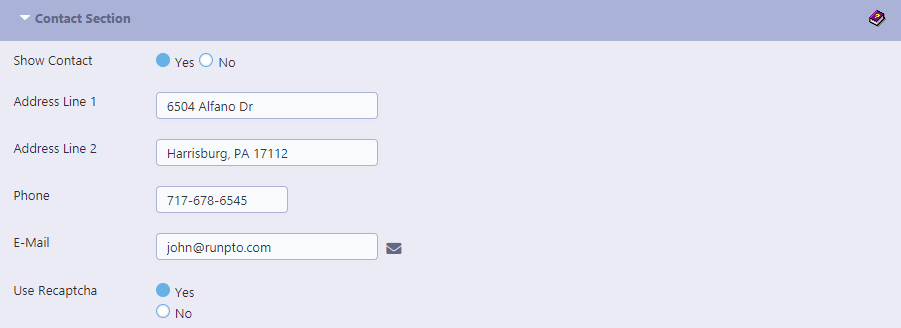
Contact Section
This section is designed to provide all necessary contact information for the PTO, making it easy for members or prospective members to reach out for assistance or information. The inclusion of this section on the website is essential for transparency and accessibility.
- Show Contact : This toggle feature allows the website administrator to make the Contact Section visible (Yes) or hidden (No) on the website. This option is useful for times when the PTO might need to update contact information or temporarily remove it from public view.
- Address Line 1 and Line 2: These fields are used to provide the physical mailing address of the PTO. In the example, “6504 Alfano Dr” is specified, with “Harrisburg” indicating the city or locality. This information is crucial for anyone needing to send physical mail .
- Phone: The phone number field, “717-541-5007” in this case, is where the PTO lists a contact number for phone inquiries. It’s a direct line for members to speak with a representative for immediate assistance or support.
- E-Mail: The provided email address, “john@runpto.com,” offers an alternative method of communication, allowing for inquiries that may not require an immediate response or for documentation purposes.
- Use reCAPTCHA: Options: Yes / No
- Details on Using reCAPTCHA: Activating the reCAPTCHA feature adds a layer of protection against spam to your contact forms by leveraging Google’s advanced security service.
- Understanding reCAPTCHA: reCAPTCHA is a free service from Google that safeguards your site from spam and bot abuse. It differentiates between actual users and automated users with sophisticated algorithms.
- Advantages of reCAPTCHA:
- Security Boost: Protects against spam and automated bot interactions. User Convenience: Simplifies the verification process for legitimate users with minimal interaction. Reliability: As a Google service, reCAPTCHA is a secure and widely-accepted standard for website protection.
- Opting Out of reCAPTCHA: Disabling the reCAPTCHA feature means that your contact forms will not include this additional verification step.

Social Media and Footer Section
This section typically appears at the bottom of every page on the website and includes important links and information that is consistently accessible from anywhere on the site. It is a standard practice to include social media links, contact information, and other essential details in the footer.
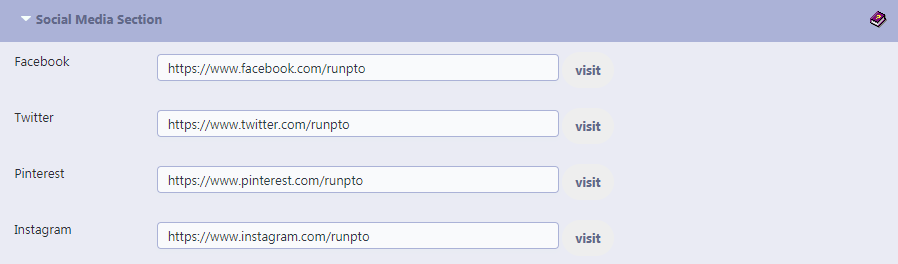
- Facebook: This field is for the PTO’s Facebook page URL, providing a link that members can follow to connect with the PTO on Facebook. The example shows “https://www.facebook.com/runpto” as the input link, and a ‘visit’ button allows users to go directly to the Facebook page.
- Twitter: Similar to the Facebook field, this one is for the PTO’s Twitter handle. The provided URL “https://www.twitter.com/runpto” directs members to the PTO’s Twitter profile, offering another platform for members to stay updated on PTO news and events.
- Pinterest: This one is for the PTO’s Pinterest handle. The provided URL “https://www.pinterest.com/runpto” directs members to the PTO’s Pinterest profile.
- Instagram: This one is for the PTO’s Instagram handle. The provided URL “https://www.instagram.com/runpto” directs members to the PTO’s Instagram profile.


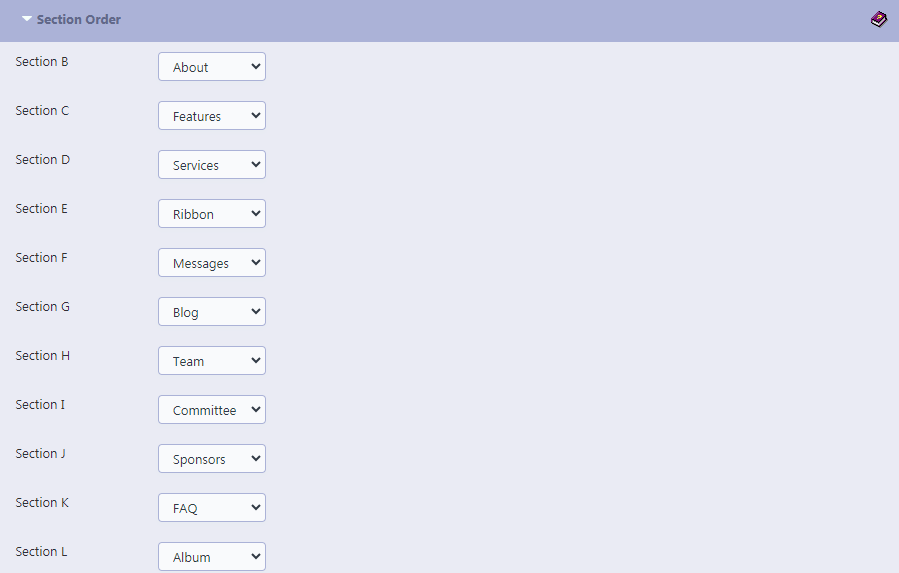
Section Order
The “Section Order” feature in the RunPTO website builder allows you to customize the arrangement of different sections on your PTO or Booster Club website. Here’s how to use this feature:
- Accessing Section Order: Navigate to the ‘Section Order’ area in your website builder dashboard.
- Changing Order:
Each section (Section B, Section C, etc.) corresponds to a different part of your website (About, Features, Services, etc.).
Use the dropdown menu next to each section to assign a website component to that slot. - Reordering Sections:
To change the order, select a different component from the dropdown menu for each section. The topmost section in this list will appear first on your website, followed by the next, in the order they are listed here. - Preview Changes:
Before finalizing the changes, preview your website to see how the new order looks and flows. - Saving Changes:
After arranging the sections in your preferred order, be sure to save your changes. - Consistency with Navigation:
Ensure the order of sections is logical and consistent with your site’s navigation menu for a better user experience. - Frequently Updated Sections:
Consider placing sections that are updated frequently, like Blog or Messages, in more prominent positions. - Importance and Relevance:
Arrange sections by their importance or relevance to current events in your PTO. - FAQs and Contact Information:
It’s often best practice to have FAQs and contact information towards the bottom of the page, as visitors typically expect to find them there.
By following this guide, you can tailor the layout of your PTO’s website to better serve the needs of your visitors, ensuring they find the most important information quickly and intuitively.
Is it possible to use an existing domain name with RunPTOs website?
Yes, absolutely! If you already have a domain name registered with providers like GoDaddy, or Namecheap, or Google Domains, or WordPress you can still use it with your RunPTO website.
To do so, you will need to point your domain name to the following nameservers:
Nameserver 1: doug.ns.cloudflare.com
Nameserver 2: sandra.ns.cloudflare.com
Once this is done, simply provide us with your domain name and we’ll take care of the rest, redirecting your domain to your website hosted on the RunPTO servers.
If you prefer, you can provide us with the desired domain name, and we will handle the process of purchasing, setting up, and maintaining it for an additional $20 per year.
e.g for GoDaddy Domain name you have purchased.